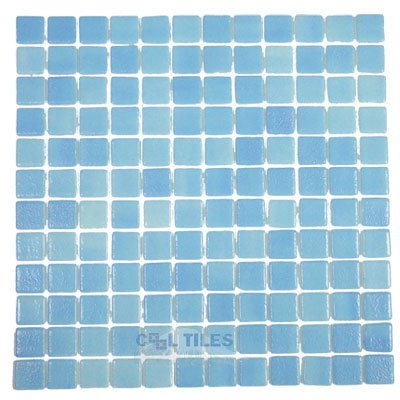
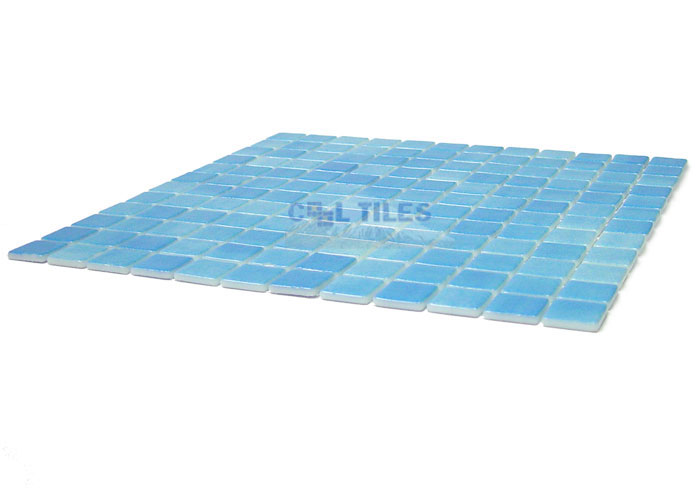
Overview
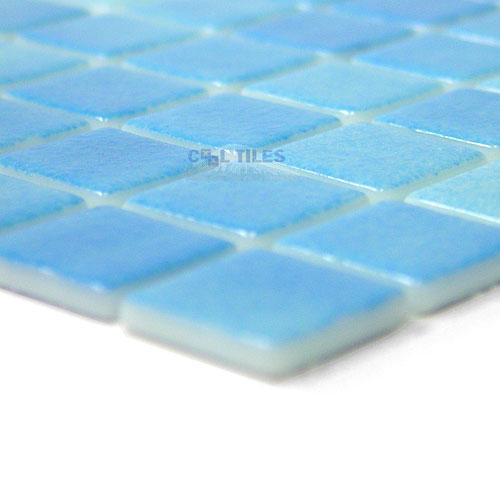
These environmentally friendly glass tiles are made of 100% recycled glass. The only truly "green" tile available, can be used on walls, backsplashes, countertops, floors and pools.
Sheet backing: MeshSheet size: 12 1/2" x 12 1/2" Tile size: 1" x 1" Thickness: 3/16" (5mm)Grout joint: 1/16" Finish Shown: Fog Turquoise Blue
Disclaimer: Tiles are handmade so variations in color and texture are to be expected. All tiles should be inspected before installation, as no adjustment will be made after installation.
Resources & Tools
-
Mesh Backed Sheets Installation Instructions
The following recommendations comply with the 2006 TCNA (Tile Council of North America) Handbook Guidelines.
Well cured mortar beds-ANSI A108.1B (cured a minimum of 7 days). Cementitious backer units (CBU)-ANSI A118.9 (Note: An ANSI A108A-2.1.8 membrane is required behind all CBU installations in wet areas. Concrete slabs (on grade) cured for 28 days minimum. Gypsum board (dry areas only)-ASTM C1396 or ASTM C1396M-04.
NOTE: Directly bonding glass tiles to wood substrates is not recommended. All surfaces to receive tile shall be left clean, and free of dust, oil, grease, paint, tar, was, curing agent, primer, sealer, adhesive residue, form release agent or any other deleterious substance and debris which may prevent or reduce adhesion. Glass tile high expansion and contraction requires the installation of movement joints.
We recommend any high grade flexible mortar system (latex modified) as a setting material for mosaic glass tiles. For grouts, a premium polymer-modified unsanded grout for joints from 1/16" (1.5mm) to 1/8" (3mm) wide. For grout lines larger than 1/8" (3mm) wide use sanded grout.
- Mix setting materials according to manufacturers' instructions.
- Apply setting materials to the substrate using the notched side of a 3/16" x 5/32" x 3/16" V- notched trowel.
- Using the flat side of the trowel, smooth out all ridges to achieve a consistent, even 1/8" thick coverage.
- Apply glass mosaics sheets, mesh-side down, firmly into the freshly troweled setting material.
- Using a rubber float or equivalent tool, gently press the tile into the adhesive to insure complete contact. Do not push the sheets too deeply into the setting materials, as to cause the setting materials to ooze up between the spaces between the tile. We recommend leaving at least 2/3 of the tile depth available for grouting.
- Adjust tile sheets for correct alignment and even spacing between sheets. Do not allow setting material to dry or skin over before completing this process.
- Clean all excess setting materials with a damp sponge. Wipe away any haze that may have remained behind.
- After 24 hours, mix grout, following manufacturer's instructions.
- Grout openings between tiles and sheets.
- Clean all excess grout immediately with a damp sponge.
- Polish off any remaining haze with a dry cloth or towel.
- After grouting, protect area from light foot traffic and light water exposure for at least 72 hours. Protect area from heavy traffic and regular use for at least 7 days.
Hand Cutting
The easiest, fastest way to cut glass tiles is with a simple glass-scoring tool and running pliers. Score the glass lightly on the front along the desired cut line. Hold tile between jaws with score lined up with center mark on top of the running pliers. Tighten adjustment screw until it stops, then back turn ¼ rotation. Gradually increase pressure on the glass tile until the score runs. Squeezing gently will give you more control over the way the tile will break.
Saw Cutting Glass Tiles may also be cut with a wet saw. If using a wet saw, be sure to use a diamond blade. A diamond blade specifically used for cutting glass has smaller diamond than those used for ceramic tiles. Never use a ceramic blade to cut glass. Ceramic blades tend to be coarser and will chip the glass. It is very important when cutting glass to use adequate amounts of water to cool the blade and to cut slowly.
When cutting glass on a wet band saw, cut tile face down. This will prevent the face of the tile from chipping. A light piece of cardboard on the saw's cutting table will protect the surface of the glass from scratches during the cutting process. If necessary finish edges of the glass with a glass grinder or scythe stone.
Glass tiles can be routinely cleaned with any non-abrasive cleaning compound or formula that is recommended for both glass and tile. Follow manufacturer's instructions when using these products.
-